Introduction
This time I won’t be writing about software related stuff but about building a Network-Attached Storage (e.g. NAS) based on FreeNAS. A family member asked me if I would be able to build a custom NAS system for him. As some years have already passed by since my last PC build, I wasn’t up-to-date with the current available hardware and I didn’t have any knowledge of NAS setups what so ever.
The requirement were:
- the data should be stored redundantly;
- it should be easily recoverable in case of failure;
- it should backup data to an external usb drive;
- the system should be easy to maintain;
- the system should have a low power consumption;
- the system should be quiet;
- there should be a notion of users and permissions with dedicated folder;
- it should be able to recover unwanted modifications on data;
- and if possible run a mail server on top of it.
Thanks to the help of some people, and especially CiPHER, at the tweakers.net forum, I was able to determine the setup I was going to assemble.
Components inventory
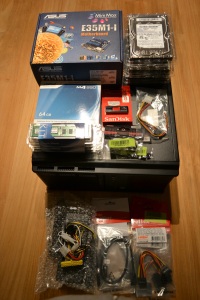
Here is the list of the components shown above:
- 1 x ASUS E35M1-I
- 3 x Samsung EcoGreen F4EG HD204UI, 2TB
- 1 x Cooler Master Elite 342
- 1 x Mini-box picoPSU 150-XT + 150W Adapter Power Kit
- 1 x Mini-box picoPSU 150-XT peripheral extension cable
- 1 x Crucial m4 CT064M4SSD2 64GB
- 1 x Crucial CT2KIT51264BD1339 8GB (4GBx2)
- 1 x SATA Power 15-pin Cable Adapter to TWIN 15-Pin SATA Power Splitter
- 3 x SATA cables
- 1 x SanDisk Cruzer USB 2.0 Flash Drive 8GB
Assembling the compontents
Here’s how I proceeded for assembling the NAS components:
- Open the side panel of the cooler master.
- Mount the 4 metal hex nuts, which are supplied with the mini-tower, so that they match the Mini ITX Form Factor on which the motherboard will be mounted.
- Put the I/O Panel Shield on the back of the motherboard and fix it on the case.
- Now we’ll put the 2 memory modules in the memory slots.
- Wire the picoPSU peripheral extension cable to the picoPSU.
- Wire the picoPSU on the ATX power connectors (24-pin and 4-pin connector) of the motherboard.
- Wire the cables of the case regarding power led, HD led, power switch and reset switch to the motherboard.
- Wire the front panel USB cable of the case to the motherboard.
- Wire the HD audio interface cable of the case to the motherboard.
- Mount the SSD in the floppy drive bay.
- Mount the 3 HD’s in the hard drive bays.
The result of it should look like the picture shown below.
Running rsync via cron job
One requirement was that a backup should be made from the ZFS pool offsite to an external USB drive. To achieve that I wrote a script based on an example that I found on the freenas forum.
- From what I understood on a blog about Freenas is that it loads all it’s stuff from the “/conf/base”-directory in a RAM disk and maps it to the standard Unix installation structure. This means that every modification you made will be lost after a reboot or shutdown. To make those modifications permanent, we have to mount the volume so that we can write on it. To do that execute the following in the shell:
mount -uw /
- Now we are going to write a shell script containing the logic for rsync-ing the ZFS pool to an external USB drive:
nano /conf/base/var/backup.sh
- Once in nano, or any other editor you whish to use, enter the following:
#!/bin/bash partition=/dev/$1 origin=/mnt/$2 target=/mnt/backup backup() { if [ -e ${partition} ]; then /bin/mkdir -p ${target} /bin/chmod 777 ${target} /usr/bin/logger "Mounting USB Device named ${partition} to ${target}..." /sbin/mount -t ext2fs ${partition} ${target} /usr/bin/logger "Mounted USB Device named ${partition} to ${target}" /usr/bin/logger "Rsyncing ${origin} to ${target}..." rsync -av --progress ${origin} ${target} /usr/bin/logger "Unmounting USB Device named ${partition} from ${target}..." umount ${target} /usr/bin/logger "Unmounted USB Device named ${partition} from ${target}" /bin/rm -r ${target} else /usr/bin/logger "USB Device named ${device} not present" fi } backup; - Make sure the script is executable:
chmod 777 /conf/base/var/backup.sh
- Set the base volume back to read-only:
mount -ur /
- Exit the shell by typing “exit” in the shell and hit the reboot option.
Once the FreeNAS system is rebooted, you should see via the shell that the script is located under /var/backup.sh. Now let’s create a cron job via the web interface of FreeNAS. As you’ll could have noticed when typing the script, there are 2 arguments:
- the first argument specifies the device name of the usb device (without the prefix /dev)
- the second argument specifies the name of the ZFS pool (without the prefix /mnt)
Let’s consider as an example that the full path to the device would be “/dev/da1s1” and the full path to the ZFS pool would be “/mnt/dablomatique”, the script have to be executed as follow:
/var/backup.sh da1s1 dablomatique
That’s it for the moment. If there are any suggestions, they are always welcome.


How fast is this system? And can you run Sickbeard?